
The architecture that will give you the least trouble and harassment is a GNU/Linux machine with a full CCP4 installation. The MacOSX executables lack the automatic CCP4
support (and you'll have to run various CCP4 programs by hand to prepare input for GraphEnt), while the windows executable lacks both CCP4 and graphics support. If you still use OSF or
SUNOS or IRIX, I bet you don't need (or even expect) a quick start quide ... ;-)
Assuming that most labs do have at least one properly configured linux machine, this guide focuses on that architecture.
Download this file : GraphEnt_installer. Then open a unix shell, locate the file, and type :
If all goes as planned, skip directly to the section entitled 'Use it' further below in this document. Note that (i) this script does not install any of GraphEnt's documentation files (you'll have to do this manually if you want them installed globally), and, (ii) for this script to work (and in order to install files in /usr/local/bin using sudo) you'll need suitable permissions. If the installer fails, you'll have to do the installation manually as shown below (I will assume that you use bash. If you are a tcsh lover, you'll have to change these 'export' things to 'setenv').
You should see a graphics window. Click on DELFIOD25 first, then click on SIGDELFIOD25, then click that you've finished, and finally, answer the question by pressing the 'Y' key for yes. The very first time you use GraphEnt there will be a long pause with apparently nothing happening. This is normal, it is FFTW testing various ways of doing the FFT on your machine. Then the program should start doing its thing, and you should have two windows (move them so that they are side-by-side). The first is the section v=0.0 of the conventional (FFT) anomalous difference Patterson map, the second will be the same section from the continuously updating maxent map [it will look relatively featureless until the calculation finishes and the map is properly contoured (see p.41 of the PDF documentation if you want the gory details)]. When all is done, your desktop may look something similar to this :
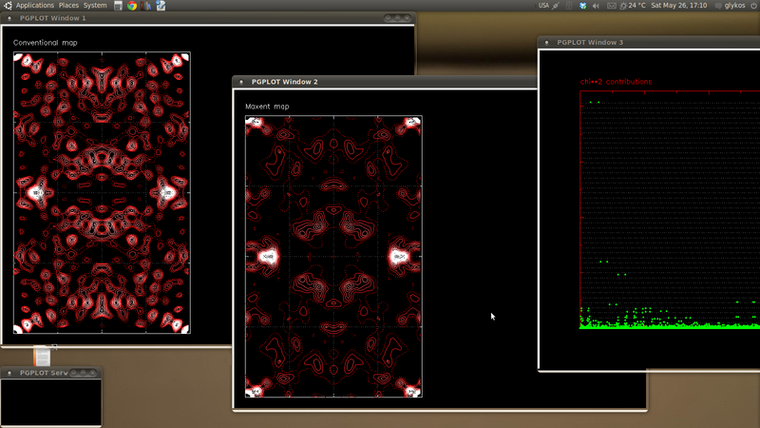
Make the unix shell window active and hit ENTER to finish it off. If you are curious, this is an anomalous difference Patterson function, the space group is P2(1)2(1)2(1), and the Harker sections are at 0.50 (the non-origin peaks you see on v=0 are cross vectors). You can use mapslicer to view the maxent map, but you will have to tell it to start contouring from mean (and not from zero). The procedure (in mapslicer) is 'Section' → 'Contours' → 'Generate contour levels starting from the mean density'.
You'll have to become root and (i) copy the executables in, say, /usr/local/bin, (ii) define the environmental variable PGPLOT_DIR for graphics to work. If you have multicore machines, you could use the parallel version of GraphEnt (as shown below). A possible series of commands (which you will have to adjust to your local setup) would be :
and then ask users to add the line
in their .bashrc file.
Piece of cake. Start the program with :
or, if you want to define resolution limits, with something like :
Then, select columns (in the correct order, order is important), and click on 'finished'. The type of syntheses that GraphEnt recognises is limited and they are discussed in the documentation (or just hit [HELP] in the initial graphent window). The main result is the maxent map file with the name maxent.map. For the meaning of all other files produced by GraphEnt you'll have to go beyond this quick start guide (there is an approximately 40 pages long PDF documentation file available with the program's distribution).
NOTE : Maximum entropy maps are always positive, which means that their mean density is not zero (as happens with conventional syntheses in the absence of F000). The implication is that no matter which program you use for plotting the maps, you should tell it to start contouring from the map's mean density and not from zero.
Assuming that most labs do have at least one properly configured linux machine, this guide focuses on that architecture.
Fully automated installer
Download this file : GraphEnt_installer. Then open a unix shell, locate the file, and type :
	chmod 755 GraphEnt_installer
	./GraphEnt_installer
If all goes as planned, skip directly to the section entitled 'Use it' further below in this document. Note that (i) this script does not install any of GraphEnt's documentation files (you'll have to do this manually if you want them installed globally), and, (ii) for this script to work (and in order to install files in /usr/local/bin using sudo) you'll need suitable permissions. If the installer fails, you'll have to do the installation manually as shown below (I will assume that you use bash. If you are a tcsh lover, you'll have to change these 'export' things to 'setenv').
Download and test it
	wget http://utopia.duth.gr/~glykos/progs/GraphEnt.tar.gz
	tar zxvf GraphEnt.tar.gz
	cd GraphEnt/bin/Linux/
	export PGPLOT_DIR=`pwd`
	mkdir test
	cd test/
	cp ../../../examples/rnase.mtz .
	../graphent rnase.mtz
You should see a graphics window. Click on DELFIOD25 first, then click on SIGDELFIOD25, then click that you've finished, and finally, answer the question by pressing the 'Y' key for yes. The very first time you use GraphEnt there will be a long pause with apparently nothing happening. This is normal, it is FFTW testing various ways of doing the FFT on your machine. Then the program should start doing its thing, and you should have two windows (move them so that they are side-by-side). The first is the section v=0.0 of the conventional (FFT) anomalous difference Patterson map, the second will be the same section from the continuously updating maxent map [it will look relatively featureless until the calculation finishes and the map is properly contoured (see p.41 of the PDF documentation if you want the gory details)]. When all is done, your desktop may look something similar to this :
Make the unix shell window active and hit ENTER to finish it off. If you are curious, this is an anomalous difference Patterson function, the space group is P2(1)2(1)2(1), and the Harker sections are at 0.50 (the non-origin peaks you see on v=0 are cross vectors). You can use mapslicer to view the maxent map, but you will have to tell it to start contouring from mean (and not from zero). The procedure (in mapslicer) is 'Section' → 'Contours' → 'Generate contour levels starting from the mean density'.
Install it
You'll have to become root and (i) copy the executables in, say, /usr/local/bin, (ii) define the environmental variable PGPLOT_DIR for graphics to work. If you have multicore machines, you could use the parallel version of GraphEnt (as shown below). A possible series of commands (which you will have to adjust to your local setup) would be :
	sudo su
	cd /something/GraphEnt/bin/Linux/
	cp GraphEnt_dual_core /usr/local/bin/GraphEnt
	cp pgxwin_server grfont.dat /usr/local/bin/
	cd /usr/local/bin/
	chmod 755 GraphEnt pgxwin_server
	ln -s GraphEnt graphent
and then ask users to add the line
export PGPLOT_DIR=/usr/local/bin
in their .bashrc file.
Use it
Piece of cake. Start the program with :
graphent my.mtz
or, if you want to define resolution limits, with something like :
graphent 10.0 3.0 my.mtz
Then, select columns (in the correct order, order is important), and click on 'finished'. The type of syntheses that GraphEnt recognises is limited and they are discussed in the documentation (or just hit [HELP] in the initial graphent window). The main result is the maxent map file with the name maxent.map. For the meaning of all other files produced by GraphEnt you'll have to go beyond this quick start guide (there is an approximately 40 pages long PDF documentation file available with the program's distribution).
NOTE : Maximum entropy maps are always positive, which means that their mean density is not zero (as happens with conventional syntheses in the absence of F000). The implication is that no matter which program you use for plotting the maps, you should tell it to start contouring from the map's mean density and not from zero.